
The control of DIY systems
I remember a friend, Sarah, endlessly frustrated with her home security bill. Every year, it crept up, and she felt locked into a contract with little flexibility. That’s the core appeal of DIY security systems – taking back control. It’s about avoiding those frustrating monthly fees and having the freedom to customize your system exactly to your needs.
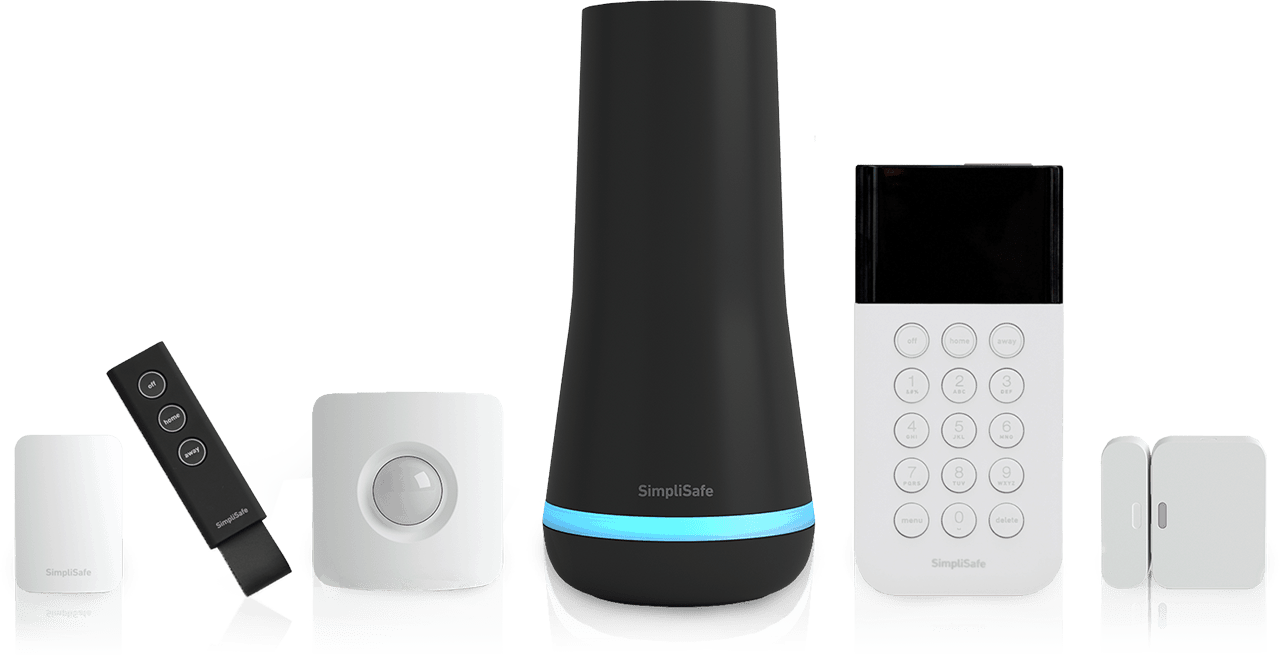
DIY systems have come a long way. They’re not the clunky, unreliable kits of the past. Companies like SimpliSafe and Ring now offer sophisticated, expandable systems that rival professionally installed options. You can build a system room by room, adding components as your budget allows.
DIY systems often cost more upfront because you're buying the hardware outright. You'll pay more on day one for high-end cameras, but you stop bleeding money on monthly monitoring fees. I've found that the hardware pays for itself in about 14 months compared to a standard ADT contract.
Comparing upfront costs
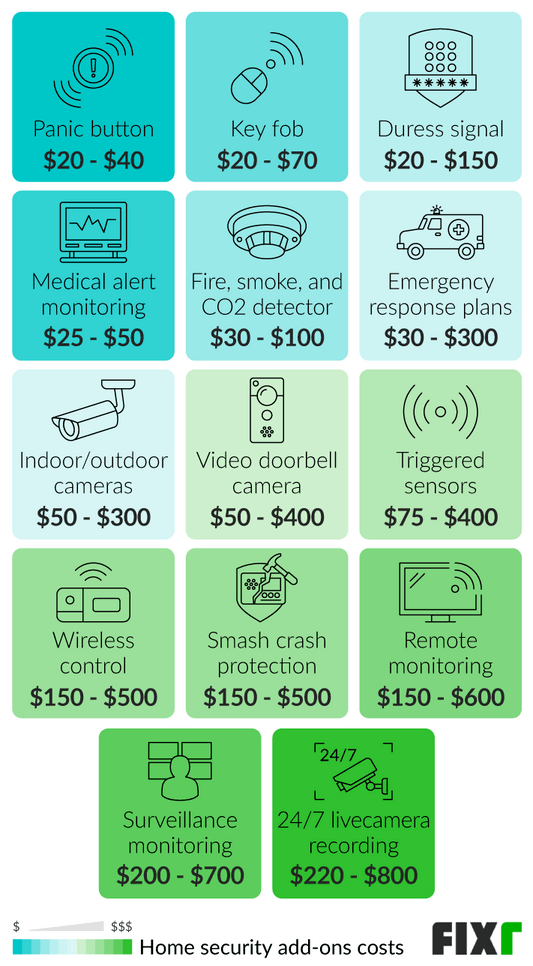
Let's break down the initial investment. A basic DIY system, consisting of a hub, door/window sensors (around $20-$30 each), a motion detector ($30-$50), and a single indoor camera ($80-$150), can easily run $300-$500. Add a video doorbell ($150-$300) and outdoor cameras ($200-$400 each), and the price quickly climbs.
Professionally installed systems often require little to no upfront equipment cost, but you’ll pay for installation, which typically ranges from $100 to $200, according to security.org’s 2026 estimates. ADT, for example, frequently offers 'free' equipment with a long-term contract. However, that equipment is often financed, and the total cost over the contract’s duration can exceed the price of buying your own.
It’s easy to overlook hidden costs. With DIY, you might need to purchase ethernet cables to hardwire cameras for a more reliable connection. Professional installations may involve additional fees for running wires through walls or ceilings. Safehome.org reports that some installations can add $500 or more for complex wiring requirements. Don't forget to factor in the cost of tools if you don’t already own them.
- DIY System (Basic): $300 - $500
- DIY System (Advanced): $800+
- Professional installation: $100 - $200 plus equipment costs (often hidden in 36-month financing)
Cost Breakdown - DIY vs. Professional
| Category | DIY | Professional |
|---|---|---|
| Equipment | Low to High | Medium to High |
| Installation | Low | Medium to High |
| Activation | Low | Low to Medium |
| Monthly Monitoring | Low to Medium | Medium to High |
| Potential Hidden Costs (Wiring, Permits) | Low | Medium |
| Long-Term Maintenance/Upgrades | Medium | Medium to High |
| Initial System Complexity | Medium to High | Low |
Illustrative comparison based on the article research brief. Verify current pricing, limits, and product details in the official docs before relying on it.
Monitoring fees and hidden extras
This is where professional systems often make their money. Basic professional monitoring plans typically start around $30-$60 per month, offering 24/7 monitoring and emergency dispatch. Cellular backup, which ensures your system stays online even during a power outage, adds another $10-$20 per month. Video storage plans can range from $10 to $30 or more, depending on the amount of footage you want to save.
Many DIY systems offer optional professional monitoring. SimpliSafe, for example, offers plans starting at $17.99 per month for basic monitoring and $27.99 for 24/7 professional monitoring. This can be a good compromise if you want the flexibility of DIY with the peace of mind of professional support.
Professional monitoring centers verify alarms and call dispatchers faster than a phone notification might wake you up. Most insurers, like State Farm and Allstate, still offer 5-10% premium discounts for monitored systems in 2026. You should call your agent with the system's certificate of installation to confirm the exact credit.
- Professional Monitoring (Basic): $30 - $60/month
- Cellular Backup: $10 - $20/month
- Video Storage: $10 - $30+/month
- DIY Monitoring (Optional): $18 - $30+/month
Featured Products

Wireless home security system with 8 pieces · Optional 24/7 professional monitoring · No contract required
This system offers a budget-friendly entry into home security with the flexibility of optional professional monitoring and smart home integration.

14-piece wireless smart home or business security system · Expandable system · Easy setup
A comprehensive and expandable security kit that provides robust features and optional professional monitoring for enhanced peace of mind.

All-in-one security kit with integrated camera, alarm, key fob, motion, and door/window sensors · DIY installation · Optional professional monitoring
This all-in-one DIY solution integrates a camera and sensors, offering a cost-effective and versatile option with optional professional monitoring.
14-piece wireless smart home or business security system · Expandable system · Easy setup
A comprehensive and expandable security kit that provides robust features and optional professional monitoring for enhanced peace of mind.
As an Amazon Associate I earn from qualifying purchases. Prices may vary.
Installation and technical hurdles
Let’s be honest: DIY installation isn't always as simple as the commercials make it seem. While many systems are designed to be user-friendly, there’s still a time commitment involved. Unboxing, pairing sensors, mounting cameras, and connecting everything to your Wi-Fi network can take several hours, even for a small home.
The technical skill required varies. Most systems rely on Wi-Fi connectivity, but some sensors might require a bit of tinkering. You’ll need to be comfortable downloading apps, creating accounts, and following instructions. If you’re not tech-savvy, it could be a frustrating experience. Some systems are genuinely easier to install than others – Ring Alarm, for example, is known for its simplicity.
Troubleshooting is inevitable. You might encounter connectivity issues, false alarms, or problems with the app. Be prepared to spend time researching solutions online or contacting customer support. It's a far cry from simply handing the task over to a professional and having them handle everything.
Long-Term Costs: Maintenance and Upgrades
DIY systems require ongoing maintenance. You’ll need to replace batteries in sensors and cameras periodically, typically every 6-12 months. Firmware updates are also essential to keep your system secure and functioning properly. Component failure is also a factor. Sensors can malfunction, cameras can break, and eventually, you’ll need to replace them.
Professional systems typically handle maintenance and upgrades as part of the contract. However, you're often locked into a specific ecosystem, making it difficult to upgrade individual components or switch to a different brand. The lifespan of security equipment is generally around 5-10 years, so you’ll eventually need to replace the entire system.
Cheap plastic sensors tend to crack or lose connectivity after two winters. Spending $10 more per sensor for weather-rated hardware prevents the cost of replacing the whole kit in three years. If a thief rips a $200 camera off your porch, DIY users eat that cost, whereas some pro contracts include equipment insurance.
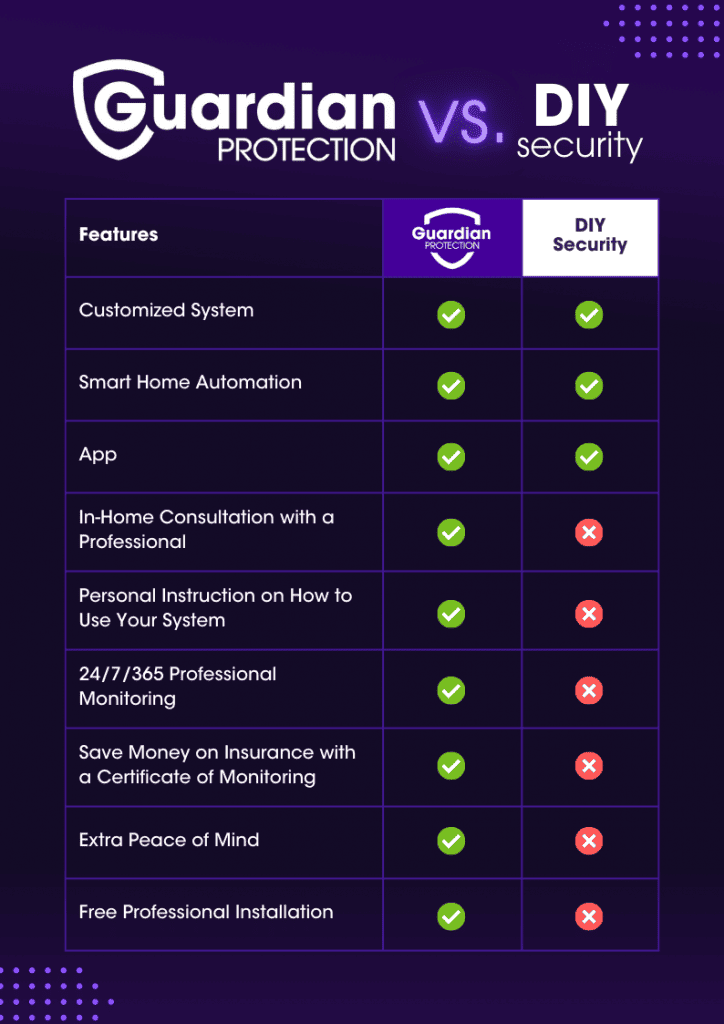
When professional help makes sense
Professional installation isn’t always a bad choice. There are situations where it makes perfect sense. Homes with complex layouts, requiring extensive wiring, are prime candidates. If you lack the technical skills or simply don’t have the time, a professional installation can save you a lot of headaches.
A fully integrated system, incorporating smart home devices like lighting and thermostats, often benefits from professional installation. A professional can ensure everything works seamlessly together. Concerns about security vulnerabilities during DIY installation are also valid. A professional can properly secure your system and minimize the risk of hacking or tampering.
Ultimately, professional installation offers peace of mind. Knowing that a trained technician has set everything up correctly and that your home is protected can be invaluable. It's an investment in security and convenience.
Hidden Costs & Fine Print
Don't skip the fine print. With DIY, hidden costs can include specialized tools, extra cables, and potential damage during installation (drilling holes in the wrong place, for example). You might also need to purchase a Wi-Fi extender to ensure adequate coverage throughout your home.
Professional systems are notorious for hidden fees. Contract cancellation fees can be substantial, often costing hundreds of dollars. Equipment purchase options can be misleading – leasing equipment might seem affordable initially, but you’ll end up paying more in the long run. Be aware of limitations in the system – some systems might not integrate with all your smart home devices.
Read the contract carefully before signing anything. Understand the terms of service, the cancellation policy, and the warranty. Pay attention to any automatic renewal clauses. Don’t be afraid to ask questions and negotiate. A little due diligence can save you a lot of money and frustration in the long run. And remember, a seemingly great deal isn’t always a great deal if it comes with hidden strings attached.
- DIY Hidden Costs: Tools, Cables, Potential Damage
- Professional Hidden Costs: Cancellation Fees, Equipment Leasing, System Limitations


No comments yet. Be the first to share your thoughts!